As a software developer, you’ve probably stumbled across old source code you’ve written from time to time and you’ve just been thinking ‘how the hell can someone come up with such bullshit?’. I don’t see myself as an exception regarding this topic and just recently had such a case, which I would like to document in this article. More specifically, I want to discuss the decoupling of views under xamarin. The source I use in this article is available on my GitHub profile.
Xamarin Navigation#
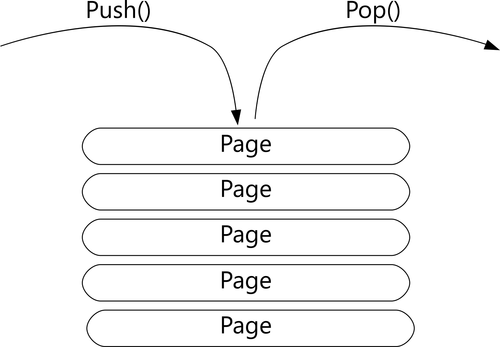
Decoupling allows you to use multiple views without dependencies between them. Without decoupling, all relevant elements would have to be edited for individual changes. Xamarin relies on a simple page-based navigation structure that is managed in the form of a stack (see figure). A new page is added with Push(), the topmost page can be removed with Pop().
These pages are usually interdependent, for example, information is required on a page that is entered on the next page. After entering the required information, the user is taken back to the calling page and the information is transferred to this one. This is exactly the point I want to clarify with this article. The strict interaction of the sides is problematic in the case of subsequent changes.
Building the demo application#
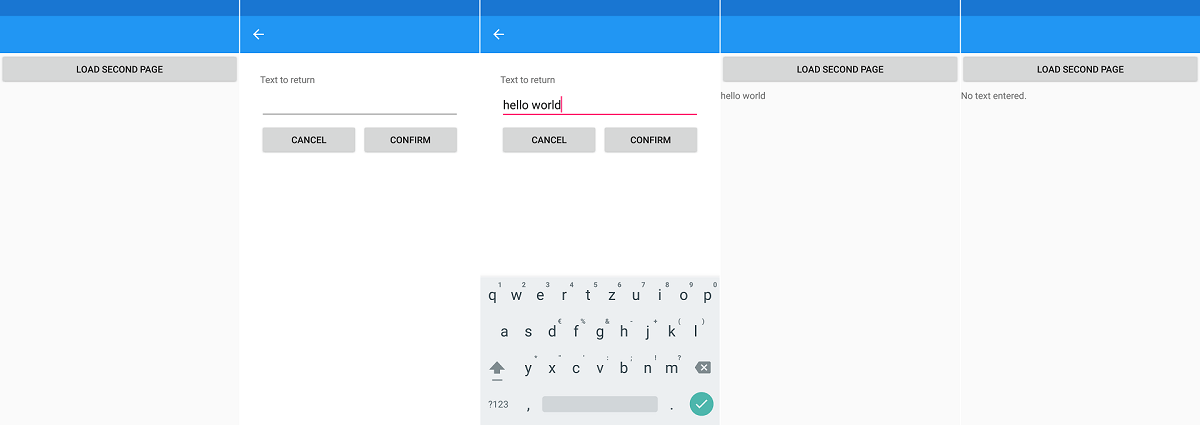
Take a look at the following screenshots to see how the demo application works. The app consists of two pages, whereby the second view is opened by a button on the first one. The second view contains an input field whose value will then be accessed in the first view. There is an additional button to abort the process. If the “Confirm” button is pressed even though no text has been entered, the user will be informed.
The default configuration of Visual Studio already creates a default page for every new Xamarin project. I created an additional one next to it. For interaction I have created an interface which manages the possible handlers. The folder structure of my main project consists of the following files:
- App.xaml (+ code-behind)
- MainPage.xaml (+ code-behind)
- InputPage.xaml (+code-behind)
- IRequireDialogInteraction
Since this project is used as showcase to demonstrate the decoupling of views, I don’t follow the MVVM-approach here. However, this is done only to minimize possible distractions, MVVM can of course still be used.
The first thing you’ll want to do is to set up a navigation page. This is done in App.xaml.cs by adding: csharpMainPage = new NavigationPage(new MainPage()); After doing so, you can navigate between your views via:
csharpNavigation.PushAsync(page);
The next thing is setting up the simple GUI:
MainPage.xaml
 1
 2
 3
 4
 5
 6
 7
 8
 9
10
11
12
13
14
15
16
17
18
19
20
21
22
23
24
25
26
27
28
29
30
31
32
33
34
35
36
37
38
39
40
41
42
43
44
45
46
47
48
49
50
51
52
53
54
55
56
57
58
59
60
61
62
63
64
65
66
67
68
69
70
71
72
73
74
| <?xml version="1.0" encoding="utf-8" ?>
<ContentPage xmlns="http://xamarin.com/schemas/2014/forms"
xmlns:x="http://schemas.microsoft.com/winfx/2009/xaml"
xmlns:local="clr-namespace:XamarinDecouplingDemo"
x:Class="XamarinDecouplingDemo.MainPage">
<ContentPage.Content>
<StackLayout>
<Button
Text="Load second page"
Clicked="OnLoadButtonClick"/>
<Label
x:Name="lblInputText" />
</StackLayout>
</ContentPage.Content>
</ContentPage>```
InputPage.xaml
```xml
<?xml version="1.0" encoding="utf-8" ?>
<ContentPage xmlns="http://xamarin.com/schemas/2014/forms"
xmlns:x="http://schemas.microsoft.com/winfx/2009/xaml"
x:Class="XamarinDecouplingDemo.InputPage">
<ContentPage.Content>
<Grid
Padding="30"
BackgroundColor="White">
<Grid.RowDefinitions>
<RowDefinition Height="Auto" />
<RowDefinition Height="Auto" />
<RowDefinition Height="Auto" />
</Grid.RowDefinitions>
<Grid.ColumnDefinitions>
<ColumnDefinition Width="*" />
<ColumnDefinition Width="*" />
</Grid.ColumnDefinitions>
<Label
Grid.ColumnSpan="2"
Grid.Row="0"
HorizontalOptions="Start"
Text="Text to return"/>
<Entry
Grid.ColumnSpan="2"
Grid.Row="1"
x:Name="txtTextToReturn"/>
<Button
Grid.Column="0"
Grid.Row="2"
x:Name="cmdCancel"
Text="Cancel"
Clicked="OnCancel"/>
<Button
Grid.Column="1"
Grid.Row="2"
x:Name="cmdConfirm"
Text="Confirm"
Clicked="OnConfirm" />
</Grid>
</ContentPage.Content>
</ContentPage>```
The second view can be left by clicking one of two buttons, cancel and confirm. These interactions will be required by the MainPage later, which is why methods for those will be added to _IRequireDialogInteraction_:
```csharp
interface IRequireDialogInteraction
{
void OnDialogConfirmation(object sender, EventArgs e);
void OnDialogCancellation(object sender, EventArgs e);
}
|
After the basic settings have been made, the actual magic will now happen in form of public EventHandler properties. MainPage needs a property of the type InputPage, which is used to interact with the second view. InputPage on the other hand will implement two event handlers, which can be accessed by MainPage. These will then be linked to the Clicked-property which is set in the xaml-file:
 1
 2
 3
 4
 5
 6
 7
 8
 9
10
11
12
13
14
15
16
17
18
19
20
21
22
23
24
25
26
27
28
29
30
31
32
33
34
35
36
37
38
39
40
41
42
43
44
45
46
47
48
49
50
51
52
53
54
55
56
57
58
59
60
61
62
63
| public partial class InputPage : ContentPage
{
public InputPage ()
{
InitializeComponent();
}
public EventHandler Confirmed;
public EventHandler Cancelled;
public String enteredText { get { return txtTextToReturn.Text; } }
public void OnConfirm(object sender, EventArgs e)
{
Confirmed?.Invoke(this, EventArgs.Empty);
}
public void OnCancel(object sender, EventArgs e)
{
Cancelled?.Invoke(this, EventArgs.Empty);
}
}```
_MainPage_ now only needs to link the event handlers to the methods which are implemented by _IRequireDialogInteraction_ and can then access the _enteredText_-property of the _InputPage_-object:
```csharp
public partial class MainPage : ContentPage, IRequireDialogInteraction
{
private InputPage _InputPage;
public MainPage()
{
InitializeComponent();
}
public void OnDialogCancellation(object sender, EventArgs e)
{
Navigation.PopAsync();
}
public void OnDialogConfirmation(object sender, EventArgs e)
{
Navigation.PopAsync();
lblInputText.Text = _InputPage.enteredText ?? "No text entered.";
}
public void OnLoadButtonClick(object sender, EventArgs e)
{
lblInputText.Text = "";
_InputPage = new InputPage();
_InputPage.Confirmed += OnDialogConfirmation;
_InputPage.Cancelled += OnDialogCancellation;
Navigation.PushAsync(_InputPage);
}
}```
And that's basically it! If you want to change the style in which user interaction happens, you'll be able to simply swap out the specific part in the methods _OnDialogConfirmation_ or _OnDialogCancellation_.
## Implementing Dialogs
Finally, I would like cover one specific detail which helped me a lot in my work with xamarin. [This plugin](https://github.com/rotorgames/Rg.Plugins.Popup) (available on GitHub & Nuget) allows you to show regular XAML-pages as dialogs. This is really helpful in combination with the decoupling shown above, since you can create custom dialogs, for example to display user prompts or general input fields to take off the load of some of the main pages. The usage looks exactly the same as that of the regular pages, except that the dialog-pages must inherit from _PopupPage_ and are called with _PushPopupAsync()_ instead of _PushAsync()_. The closing of the page takes place analogously with _PopPopupAsync()_.
|